Easy Crochet Cluster Blanket

Wednesday 5 June 2024


I have a truly lovely crochet blanket pattern to share with you today. It's a stitch that is probably in every old crochet book, and loved by many crocheters through the decades. It's also probably the easiest crochet blanket pattern there is!

It's what I like to call a "mindless" pattern; I completed the entire blanket while binging my favourite TV series. It really doesn't take much concentration at all!

I wanted to add something "special" to this blanket. After much perusing, I discovered this yarn by Hobbii called Mocktail. It's a super soft acrylic/ wool blend. But the special part is that it has these beautiful, subtle sparkles spread throughout the lighter colours.

The yarn, with its soft and slightly sparkly texture, adds a touch of elegance and modernity to this timeless pattern.


For convenience, I've created a full free Youtube tutorial here!


Yarn used

- 16 skeins of Hobbii Mocktail in Virgin Margarita (50g/ 98yds) = 1600 yds
- Contrasting yarn of similar weight for border (optional - I used same yarn for border)

Other Items used

- Size J/ 5.75mm crochet hook (or hook to match yarn weight)
- Scissors
- Yarn needle

Abbreviations and stitches

• St(s): Stitch(es) 
• SC: Single crochet 
• HDC: Half Double Crochet
• DC: Double Crochet
• Sk: Skip a stitch
• (...) x n: Repeat instructions in brackets n times
**This pattern uses US Crochet Terms**

Pattern

1. Create the foundation chain
Foundation chain number = (multiple of 3) + 2
My blanket (40 inch x 48 inch): 131 chain stitches for foundation chain (129+2)


R1: Starting in 2nd ch from the hook: 1 SC in each st back down the ch. Ch 1, turn

R2: Start in last SC from previous row. (SC, HDC, DC) in same st, sk 2. Repeat until end of row. 1SC into the last SC. Ch 1, turn.

Row 3 - n: Repeat row 2 steps until desired length is reached 

Note: Each “cluster” will always go into a SC stitch 

If using contrasting colour for border, fasten off and weave in the ends


Border

R1: Attach contrasting yarn (if using) anywhere on the blanket and ch 1. SC around blanket, with 3 SC in each corner. Sl st back into first SC.

R2: Ch 2. DC around blanket, with 3 DC in each corner. Sl St back in to 1st DC.

Fasten off and weave in all the ends


Read More

No-Sew Quick Crochet Mini Dinosaur

Wednesday 15 May 2024


This is a crochet pattern to make this super cute mini dinosaur. And it's no-sew!
There is a full free Youtube tutorial to crochet this mini dinosaur here!


Yarn used

Hobbii Baby Snuggle in Powder Blue and Light Blue

Other Items used


- US G/4.5mm Crochet Hook
- 8mm safety eyes
- Yarn needle
- Poly fill
- Stitch markers
*Please note that safety eyes are NOT recommended for children under the age of 3 years.

Abbreviations and stitches


• MR: Magic ring
• St(s): Stitch(es)
• SC: Single crochet
• Inc: Increase (Stitch 2 SC into the stitch)
• Dec: Decrease using the invisible method
• (...) x n: Repeat instructions in brackets n times
**This pattern uses US Crochet Terms**

Pattern

Head/ Body

R1: 8 SC in a MR
(or ch 2, 8 SC in 1st ch)
R2: 8 inc (16)
R3: 16 SC
R4: 7 SC, inc, SC, inc, 6 SC (18)
R5: 18 SC
R6: 5 SC, 4 dec, 5 SC (14)
R7: 3 SC, 4 dec. 3 SC (10)
R8: 10 inc (20)
Insert safety eyes between R4-R5, 5-6 sts apart

Stuff the head

R9: 20 SC
Make 1 or 2 SC to get to back of the body (move stitch marker here as new end of round)
R10: Inc, 19 SC (21)
R11: 21 SC
R12: Dec, 19 SC (20)
R13: 10 dec (10)

Stuff the body

R14: 5 dec (5) 

Close and cut the yarn, leaving a short tail. Use tail to sew the hole closed.

Spikes

Insert hook one stitch in front of centre top of head (i.e. one stitch in front of starting magic ring)

Ch 3; starting in 2nd ch from hook: SC 2 back along chain
Sk one round on head, sl st into next round on head/body
Repeat steps all the way down the back
Close and cut the yarn, and weave in the ends


Read More

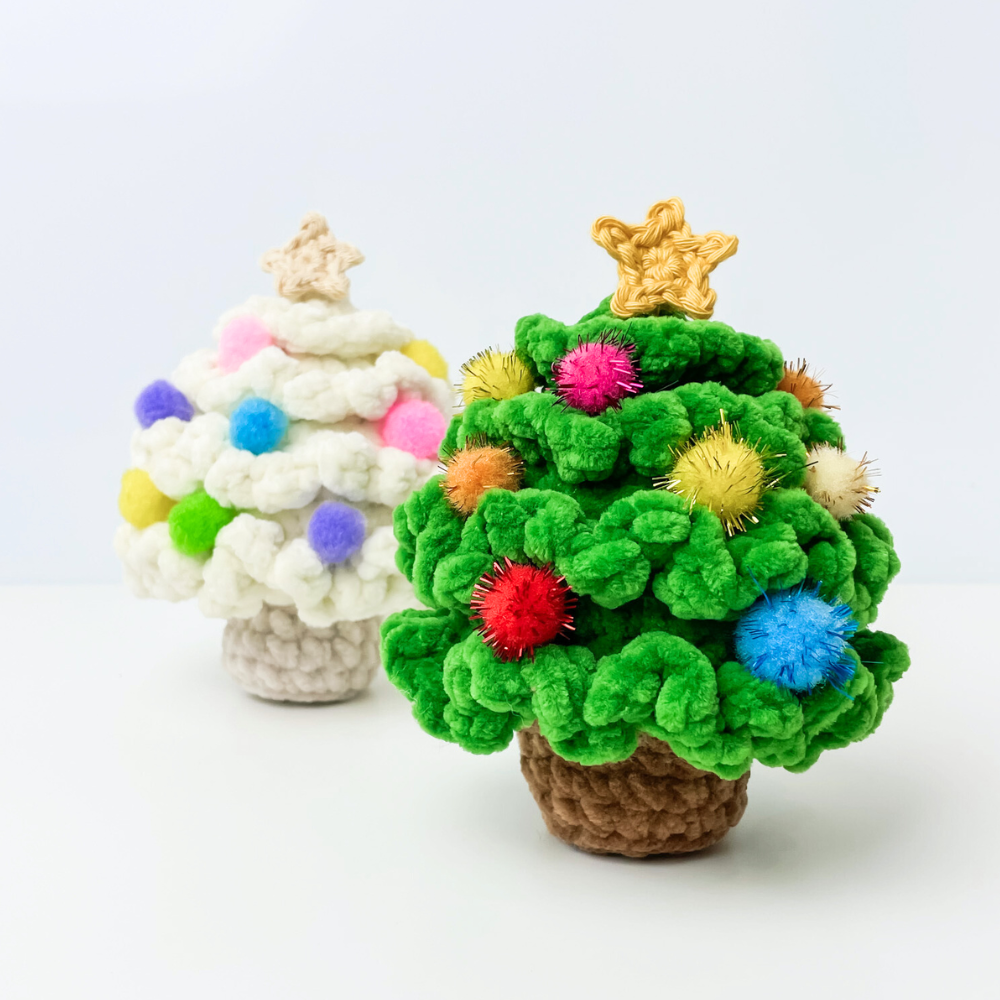
Crochet Christmas Tree - Free Crochet Pattern

Tuesday 31 October 2023


This is a crochet pattern to make this super cute little Christmas Tree.

There is a full tutorial for this Christmas Tree here:


Yarn used

- Hobbii Baby Snuggle in Green and Teddy
- Medium weight yellow cotton yarn

Other Items used

- US G/4.5mm Crochet Hook
- US E/3.5mm Crochet hook
- Yarn needle
- Poly fill
- Stitch markers
- Mini pom-poms

Abbreviations and stitches

• MR: Magic ring 

• St(s): Stitch(es) 

• SC: Single crochet 

• DC: Double Crochet

• BLO: Back loops only

• FL: Front Loops

• Inc: Increase (Stitch 2 SC into the stitch) 

• Dec: Decrease using the invisible method

• (...) x n: Repeat instructions in brackets n times

• Bobble: 

**This pattern uses US Crochet Terms**


Pattern

Tree


(Green yarn and larger hook)
R1: 6 SC in a MR
R2: (SC, inc) x 3 (9)
R3: (2 SC, inc) x 3 (12)
Add stitch markers to FLs of first and last stitch of R3
R4: 12 SC in BLO
R5: (SC, inc) x 6 (18)
R6: 18 SC
Add stitch markers to FLs of first and last stitch of R6
R7: In BLO: (2 SC, inc) x 6 (24)
R8: 24 SC
R9: (3 SC, inc) x 6 (30)
Add stitch markers to FLs of first and last stitch of R9
R10: 30 SC in BLO
R11: (4 SC, inc) x 6 (36)
R12: 36 SC
Add stitch markers to FLs of first and last stitch of R12
R13: In BLO: (2SC, dec) x 9 (27)
R14: (SC, dec) x 9 (18)
R15: 9 dec (9)
Close and cut the yarn. Tuck the tail into the tree.


Frills

Top frill only:

Attach yarn in one of the unstitched front loops of R3, ch 1
(SC, DC) in each unstitched FL around
Sl st to first frill
Close and cut the yarn. Tie the two tails together, and pull the knot into the tree

Other frills:

Attach the yarn in one of the unstitched front loops of (R6, R9, R12), ch 1
(SC, DC, SC) in each unstitched FL around
Sl st to first frill
Close and cut the yarn. Tie the two tails together, and pull the knot into the tree

Trunk

(Brown yarn and larger hook)
R1: 9 SC in a MR (crochet loosely so you can pull the ring closed)
(Alternative method: Ch 2, make 9SC in 2nd ch from hook)
R2: 9 inc (18)
R3: 18 SC in BLO
R4-5: 18 SC
Close with sl st. Cut the yarn, leaving a long tail for sewing.
Stuff the trunk
Use tail to sew the trunk to the base of the tree, at R14 (one round before the end)
Add more stuffing before you reach the end


Star

(Medium/ worsted weight yarn and smaller hook)

R1: 5 SC in a MR, sl st to 1st SC
R2: (ch 2, sl st into 2nd ch from hook, sl st into next st on R1) x 5

Close and cut the yarn, leaving a long tail for sewing
Use a yarn needle to bring the yarn tail to the back of the star, and tie the yarn tails together
Sew the star on to the top of the tree

Finishing Touches

Glue pom-poms on to the tree


Read More

No-Sew Quick Crochet Ghost - Free Crochet Pattern

Wednesday 5 October 2022


This is a crochet pattern to make this super cute mini ghost. And it's no-sew!


Yarn used

Hobbii Baby Snuggle in White

Other Items used

- US G/4.5mm Crochet Hook
- 9mm safety eyes
- Yarn needle
- Poly fill
- Stitch markers
*Please note that safety eyes are NOT recommended for children under the age of 3 years.

Abbreviations and stitches

• MR: Magic ring 

• St(s): Stitch(es) 

• SC: Single crochet 

• HDC: Half Double Crochet

• BLO: Back loops only

• FLO: Front loops only

• Inc: Increase (Stitch 2 SC into the stitch) 

• Dec: Decrease using the invisible method

• (...) x n: Repeat instructions in brackets n times

• Bobble: 

Yarn over, insert the hook, yarn over, pull through a loop. DO NOT complete the stitch. Repeat the steps 5 times in total. There should be 11 loops on the hook.

Yarn over and pull through all 11 loops on the hook to complete the stitch.

Please see the video tutorial for further detailed instruction on this

**This pattern uses US Crochet Terms**


Pattern


R1: 6 SC in a MR
R2: 6 inc (12)
R3: (SC, inc) x 6 (18)
R4: (2SC, inc) x 6 (24)
R5-8: 24SC (4 rounds)
R9: 6SC, 1 bobble, 10SC, 1 bobble, 6SC (24)

Eyes: between R7 and R8, 5 sts apart

R10-11: 24SC
Mark first and last back loop of R11 with markers
R12 (FLO): ([SC, HDC, SC] into 1 st, sl st into next st) x 12
R13: In back loops of R11 (1st and last sts were marked earlier): 24SC
R14: (SC, dec) x 8 (16)
Stuff
R15: 8 dec (8)


Read More

Mini Crochet Candy Corn - Free Quick Crochet Pattern

Monday 3 October 2022


This is a crochet pattern to make this super cute mini candy corn!


Yarn used

Hobbii Baby Snuggle
- Baby duck colour
- White colour
- Burnt orange colour

Other Items used

- US G/4.5mm Crochet Hook
- 9mm safety eyes
- Yarn needle
- Poly fill
- Stitch markers -optional
*Please note that safety eyes are NOT recommended for children under the age of 3 years.

Abbreviations and stitches

• MR: Magic ring 

• St(s): Stitch(es) 

• SC: Single crochet 

• Inc: Increase (Stitch 2 SC into the stitch) 

• Dec: Decrease using the invisible method

• (...) x n: Repeat instructions in brackets n times

**This pattern uses US Crochet Terms**


Pattern

Body/ head

- Start with white

R1: 6 SC in a MR
R2: (SC, inc) x 3 (9)
R3: (2SC, inc) x 3 (12)
R4: 12 SC

Change to orange

R5: (3SC, inc) x 3 (15)
R6: (4SC, inc) x 3 (18)
R7: 18 SC

Change to yellow

R8: (5SC, inc) x 3 (21)
R9: (6SC, inc) x 3 (24)
R10: 24SC

Attach eyes between R6 and R7, 4 sts apart

R11: (SC, dec) x 8 (16)
R12: Dec x 8 (8)

Close and cut the yarn, leaving a tail for sewing

Stuff the candy corn

Use yarn tail to sew the hole closed, and weave in the ends


Finishing Details

- Embroider whites of eyes using white yarn 


Read More

Crochet Duck - Free Crochet Pattern

Friday 27 May 2022


This is a crochet pattern to make this super cute little duck! 


Yarn used

Hobbii Baby Snuggle
- Baby duck colour (body)
- Curry colour (feet, bill)

Rainbow Cotton 8/4
- Black (eyebrows)
- White (whites of eyes)

Other Items used

- US G/4.5mm Crochet Hook
- 9mm safety eyes
- Yarn needle
- Poly fill
- Stitch markers -optional
*Please note that safety eyes are NOT recommended for children under the age of 3 years.

Abbreviations and stitches

• MR: Magic ring 

• St(s): Stitch(es) 

• Sl st: Slip Stitch

• Ch: Chain Stitch

• SC: Single crochet 

• Inc: Increase (Stitch 2 SC into the stitch) 

• Dec: Decrease using the invisible method

• (...) x n: Repeat instructions in brackets n times

**This pattern uses US Crochet Terms**


Pattern

Body/ head

- Light yellow
R1: 8 SC in a MR
R2: 8 inc (16)
R3: (SC, inc) x 8 (24)
R4: (3SC, inc) x 6 (30)
R5: (4SC, inc) x 6 (36)
R6-10: 36 SC (5 rounds of 36)
R11: (4SC, dec) x 6 (30)
R12: 30SC
R13: (3SC, dec) x 6 (24)
R14: 24SC
R15: (2SC, dec) x 6 (18)
Stuff
R16: (SC, dec) x 6 (12)
R17: 12 SC
Move directly on to head

Head

R18: 12 inc (24)
R19: (3SC, inc) x 6 (30)
R20: (4SC, inc) x 6 (36)
R21-24: 36 SC (4 rounds of 36)

Eyes: between R22 and R23, 4 or 5 sts apart

R25: (4SC, dec) x 6 (30)
R26: (3SC, dec) x 6 (24)
R27: (2SC, dec) x 6 (18)
Stuff head and neck
R28: (SC, dec) x 6 (12)
R29: 6 dec (6)
Close and cut the yarn, leaving a tail for sewing. Sew the hole closed.

Wings (make 2)

- Light yellow
R1: 4 SC in a MR
R2: 4 inc (8)
R3: (SC, inc) x 4 (12)
R4. 12SC
R5: (2SC, inc) x 4 (16)
R6: 16 SC
R7: (2SC, dec) x 4 (12)
R8: (SC, dec) x 4 (8)

Flatten top of wing. SC across top of wing to close.
Close and cut the yarn, leaving a tail for sewing.

Feet (make 2)

- Orange/ darker yellow
R1 : 6SC in a MR (6)
R2 : 6 inc (12)
R3: 12 SC
R4: (2SC, dec) x 3 (9)
R5: (SC, dec) x 3 (6)
Fold flat, SC along top to close.

Close and cut the yarn, leaving a long tail for sewing.

Bill

- Orange/ darker yellow
Ch 5
R1: SC in 2nd ch from hook (mark this st), 2SC, 3SC in last ch
Underside: 2SC, inc, sl st into 1st marked SC (10)
The next round starts in the st after the sl st

R2: 10 SC
R3: (4SC, inc) x 2 (12)
R4: 12 SC
Sl st to close. Cut the yarn, leaving a long tail for sewing.

Assembly


- Sew the wings at the side of body, one round below the neck

- Sew the feet under the body, starting at R3 or R4 (roughly in line with the eyes, facing outwards slightly)

- Sew the bill on to the front of the face, just under the eyes (as close to the eyes as possible)


Tail

Use either darker or lighter colour 
Attach the yarn at the back of the duck where the tail should go. Ch 8, sl st back into a st right next to the starting st on the duck .
Repeat for as many loops as you prefer (the duck pictured has 3 tail loops). 
Close and cut the yarn. Tie the tails together and use the yarn tails to pull the knot into the body. 


Hair

Use either lighter or darker colour
Attach the yarn at the top of the head. Ch 8, sl st back into a st right next to the starting st.
Repeat for as many loops as you prefer (the duck pictured has 2 hair loops)
Tie the tails together and use the yarn tails to pull the knot into the head

Finishing Details

- Embroider whites of eyes using white yarn
- Embroider eyebrows using black yarn


Read More